Compliant AI Deployments with CI/CD and Infrastructure as Code
A step-by-step playbook for repeatable, auditable infrastructure deployments in regulated environments
Deploying infrastructure manually is time-consuming and prone to errors. Manual processes rely on humans repeating the same tasks without validation checks, leading to configuration drift, inconsistencies, and undocumented changes. In regulated healthcare environments, this is especially problematic: every infrastructure change needs to be traceable, repeatable, and auditable. CI/CD pipelines with infrastructure as code address all three requirements at once.
In this post, we walk through setting up a CI/CD pipeline that automates cloud infrastructure deployments using GitLab and Terraform. The same principles apply to GitHub Actions, Azure DevOps, or any other pipeline tool. The goal is a deployment process where every change is version-controlled, every run is logged, and no human needs direct console access to production environments.
Overview
The approach has three parts. First, we write a Terraform script to define the infrastructure and a pipeline configuration file to execute it on commit. Second, we configure identity federation so the pipeline can authenticate to the cloud provider without storing long-lived credentials. Third, we set up remote state management so Terraform can track what has been deployed and prevent concurrent conflicting changes.
By the end, you will have an automated deployment pipeline where pushing code to the main branch triggers a Terraform plan and apply, with full logs available for audit. No manual steps, no shared credentials, no configuration drift.
Prerequisites
- A cloud account with appropriate permissions
- A GitLab account (free tier is sufficient)
- Approximately 45 minutes
Walkthrough
Step 1: Build the Repository
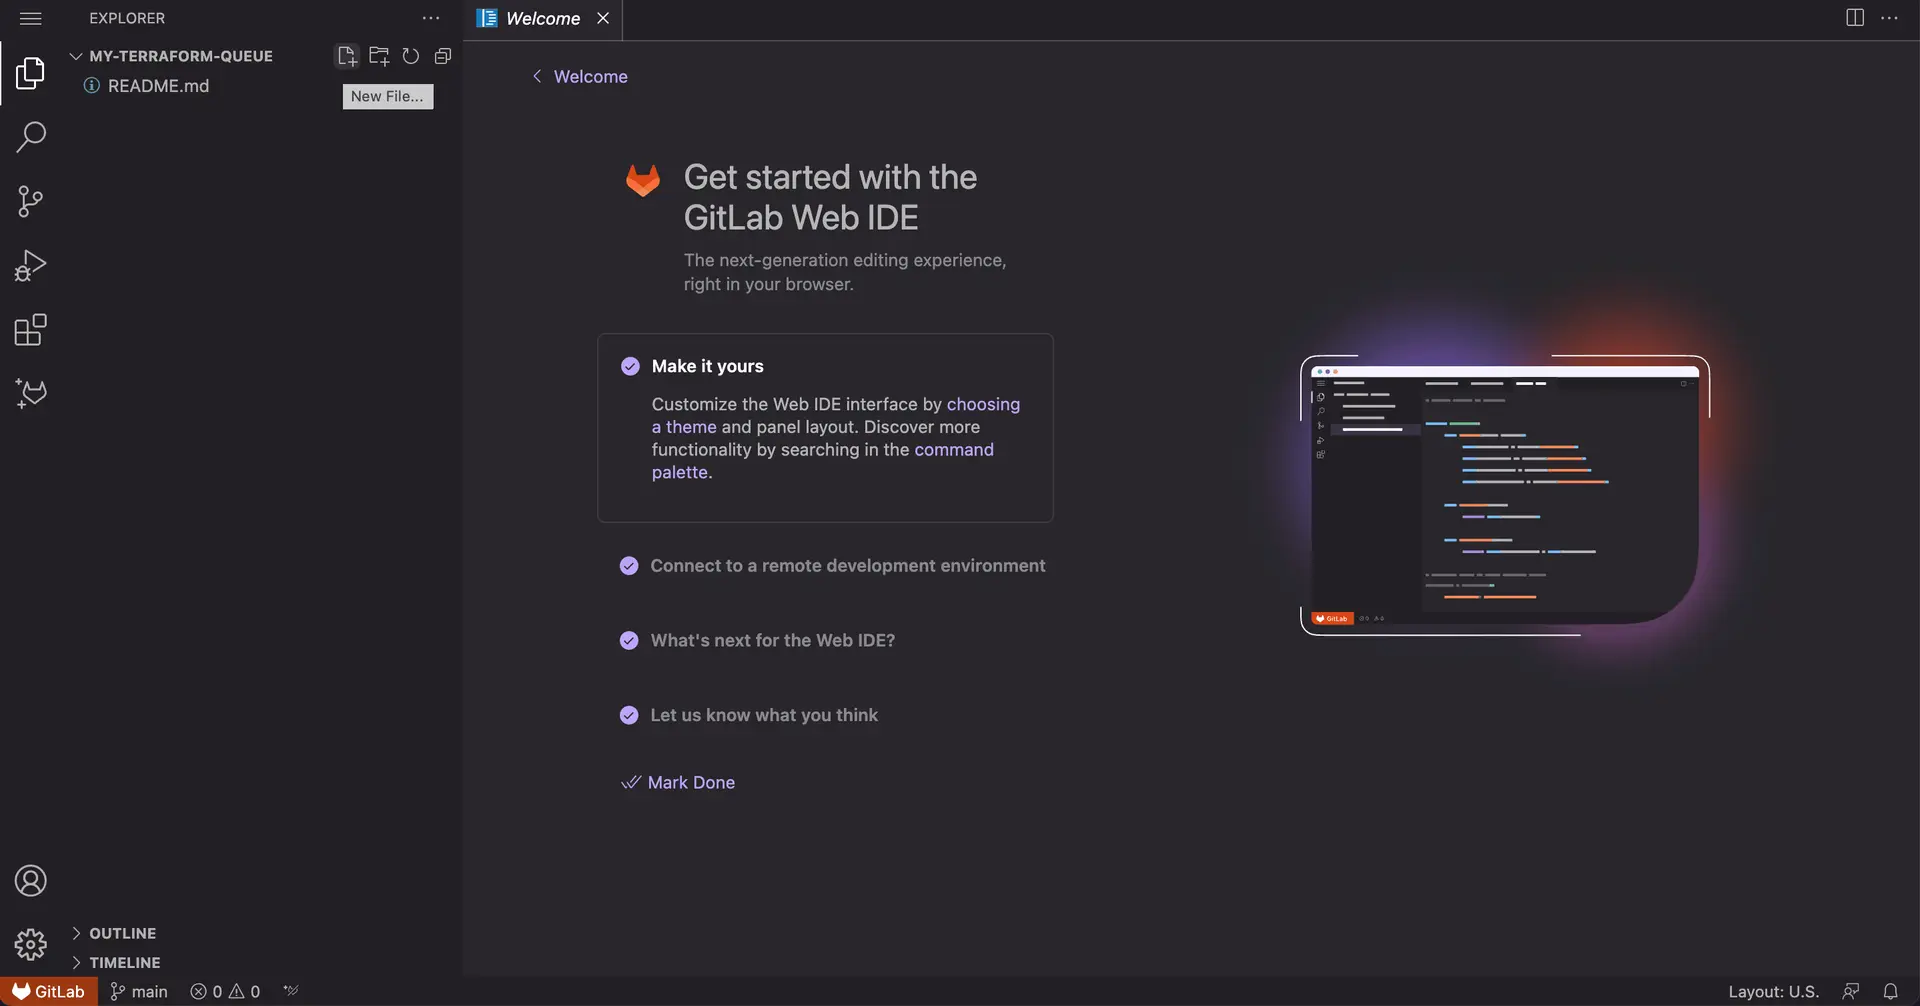
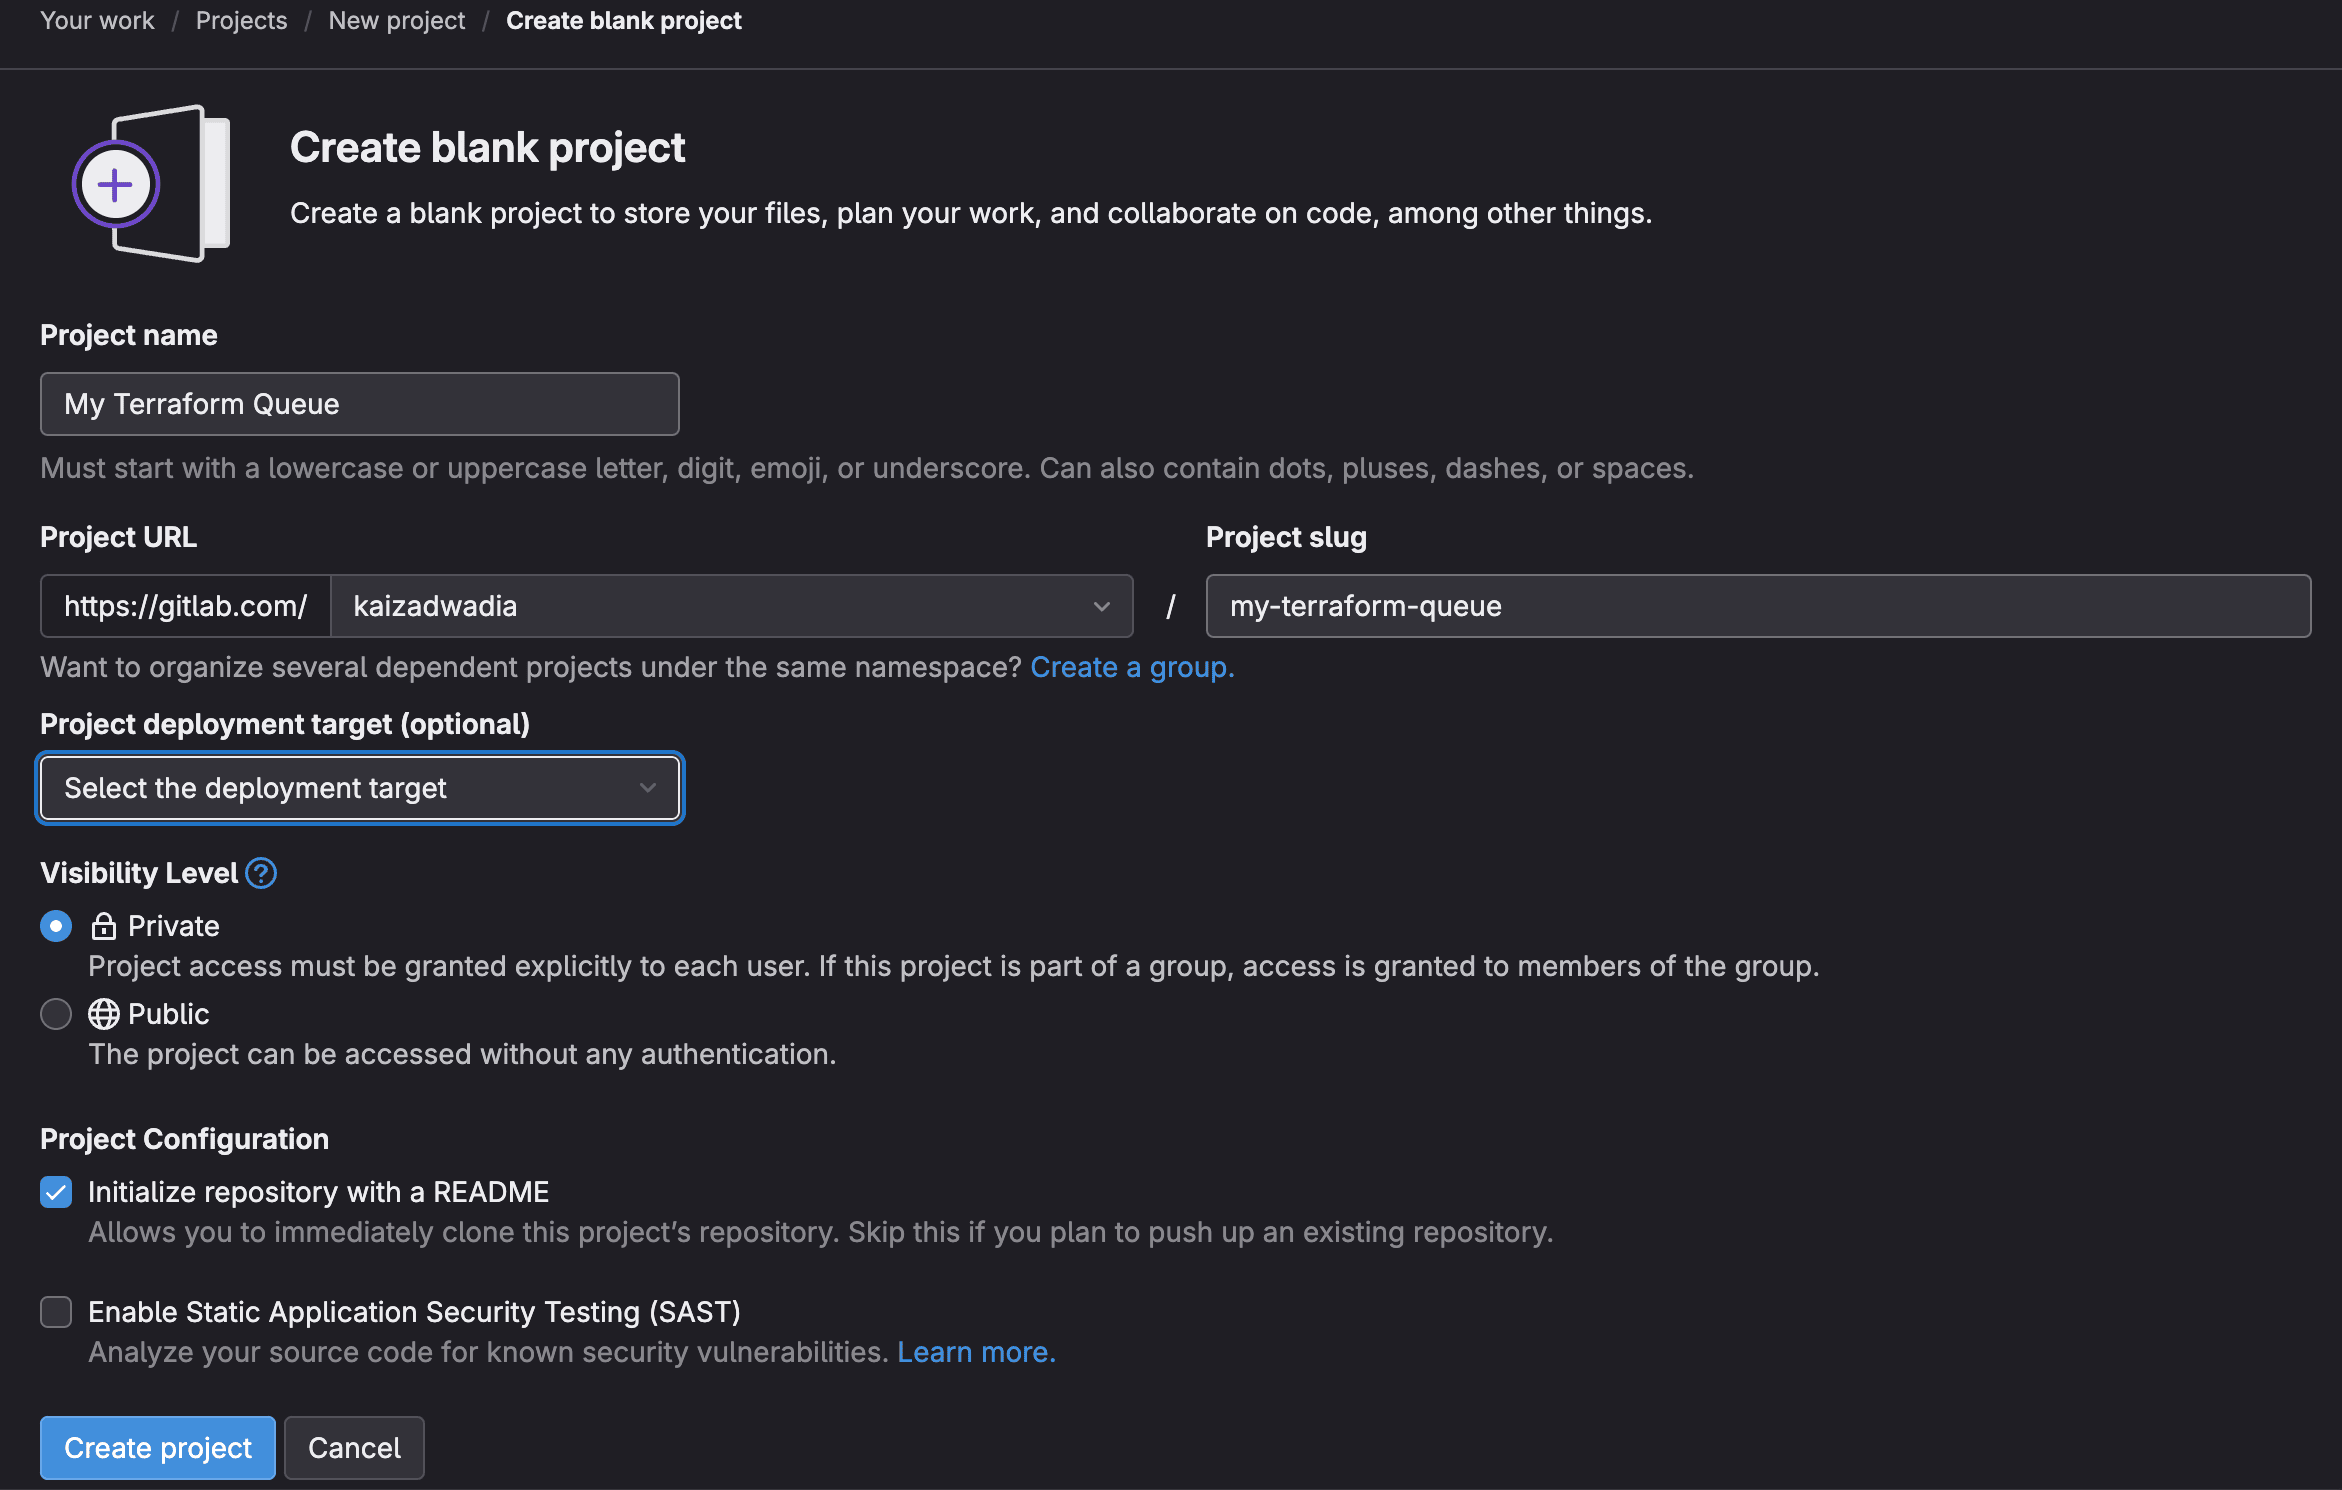
Create a new GitLab repository to store the Terraform configuration. In GitLab, click New project, then Create blank project. Give it a name such as my-terraform-queue. Once created, open the Web IDE from the Edit dropdown on the repository home page.
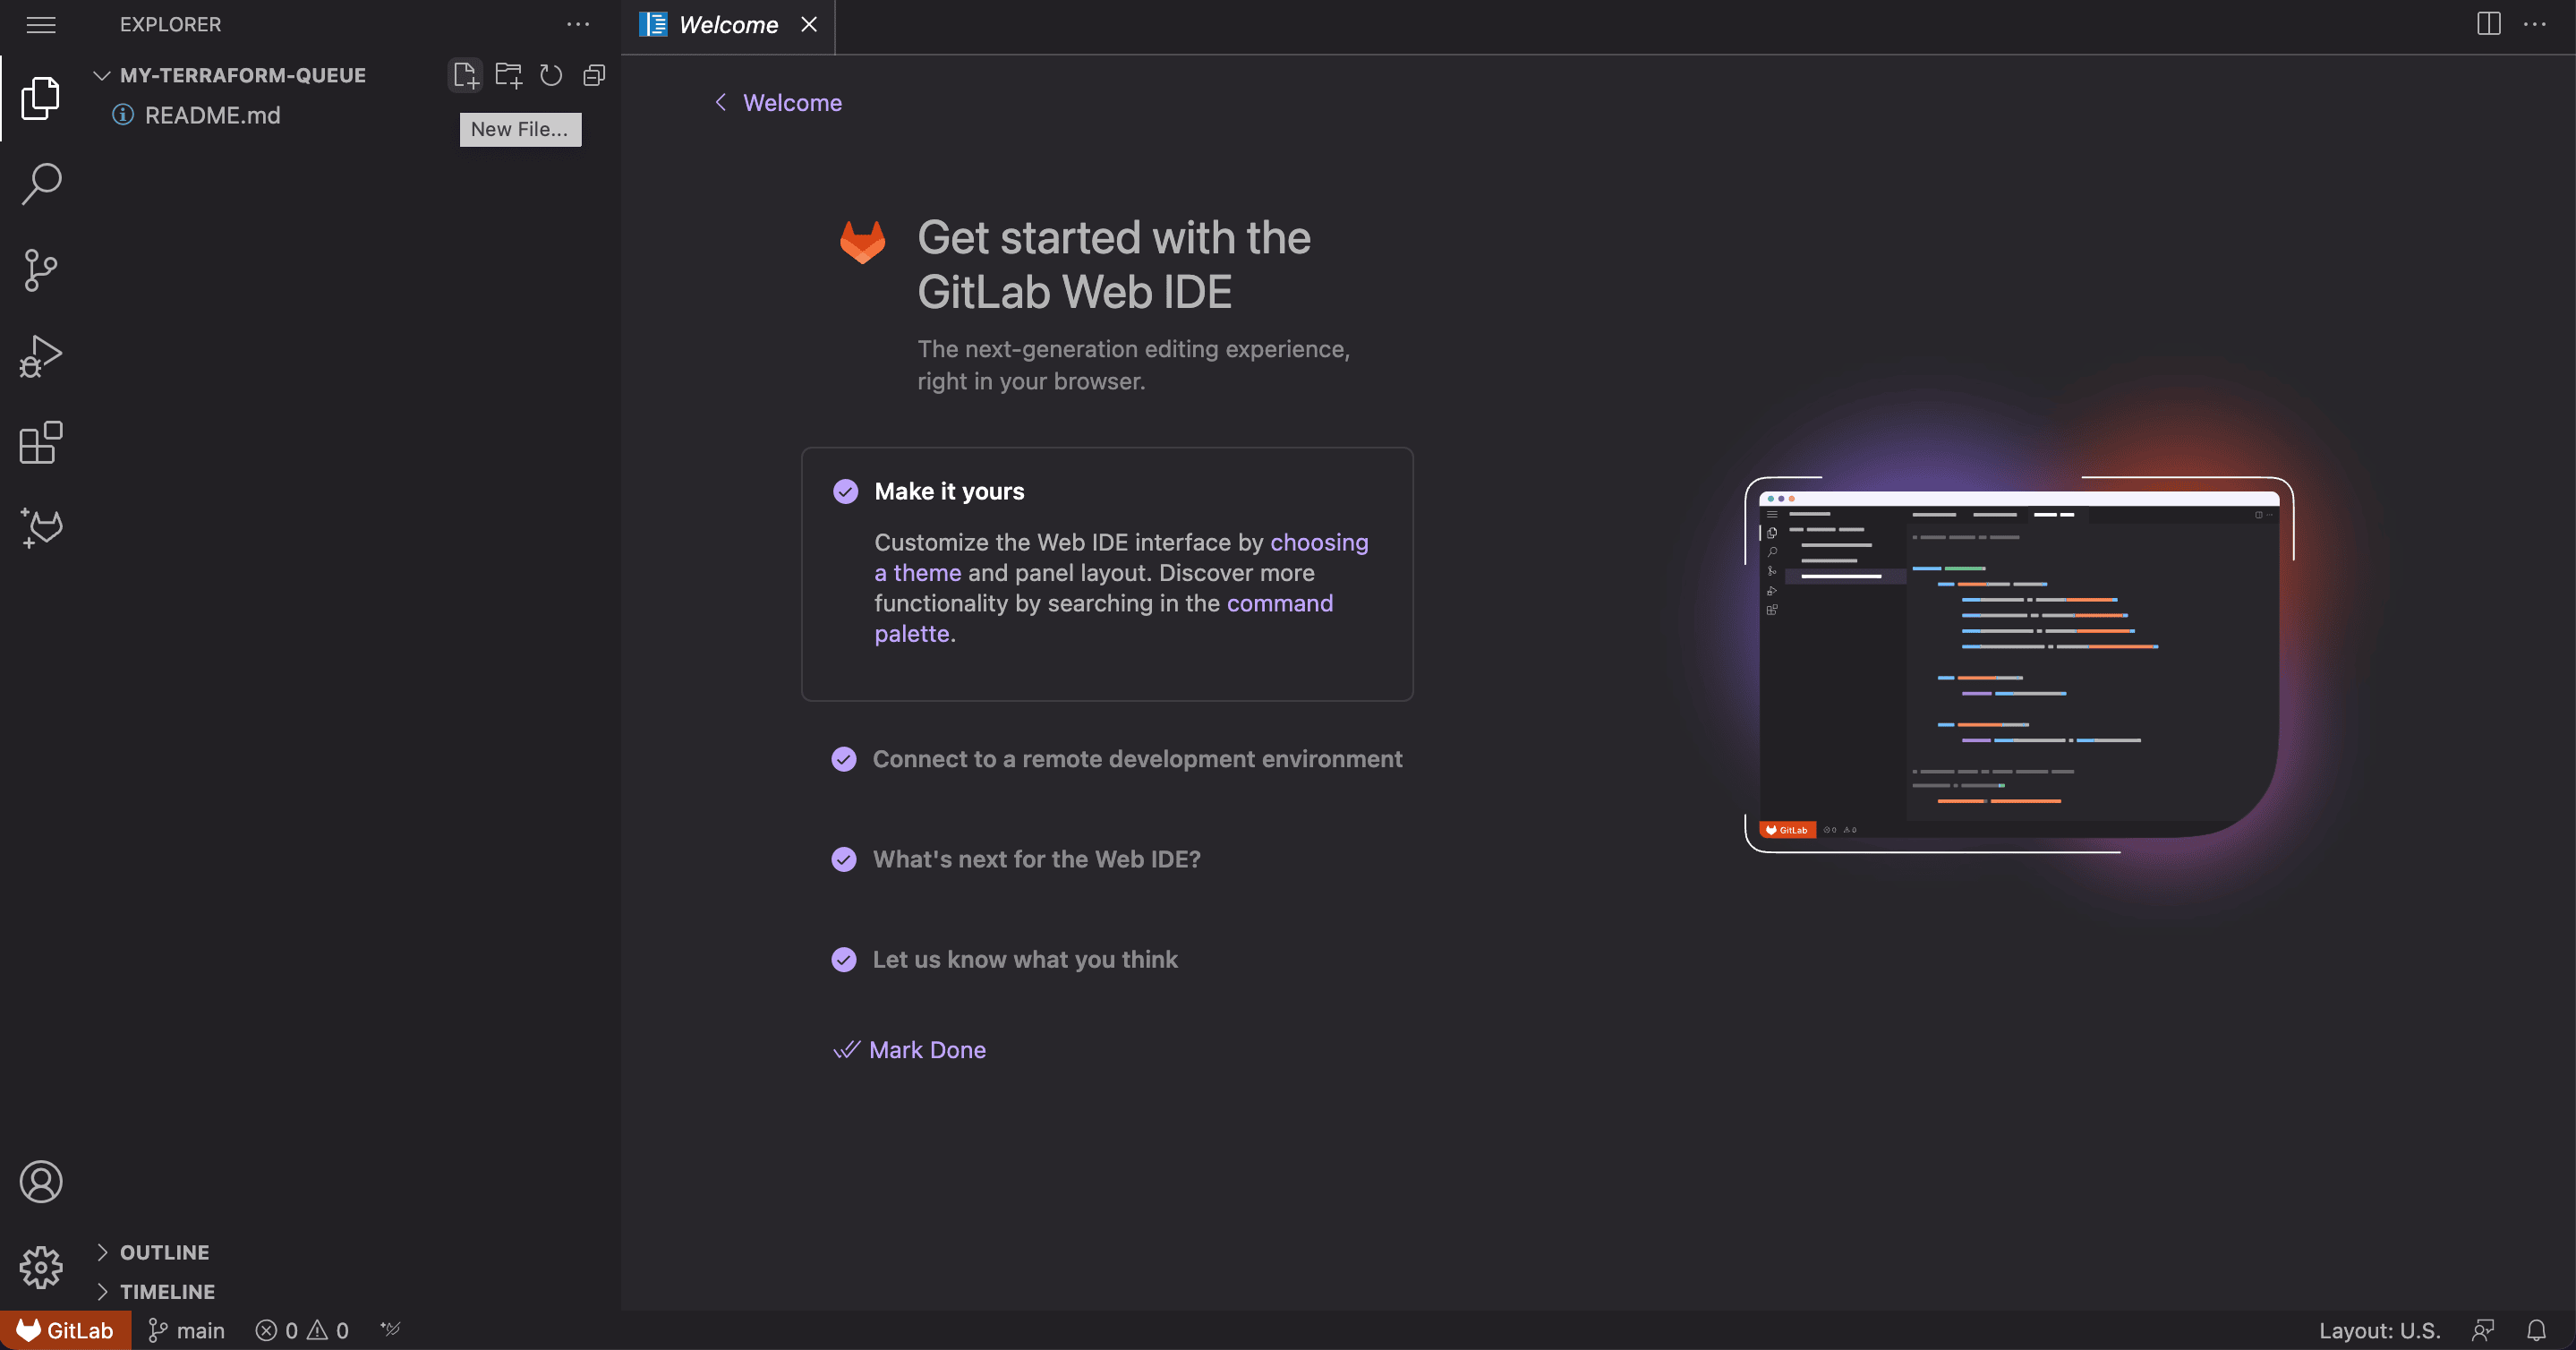
Create a file called main.tf and add a minimal resource definition to start with:
resource "aws_sqs_queue" "queue" {
  name = "sample-queue"
}
Commit this to the main branch. We will expand this file later. For now, the focus is on getting the pipeline and permissions in place first.
Step 2: Configure an Identity Provider
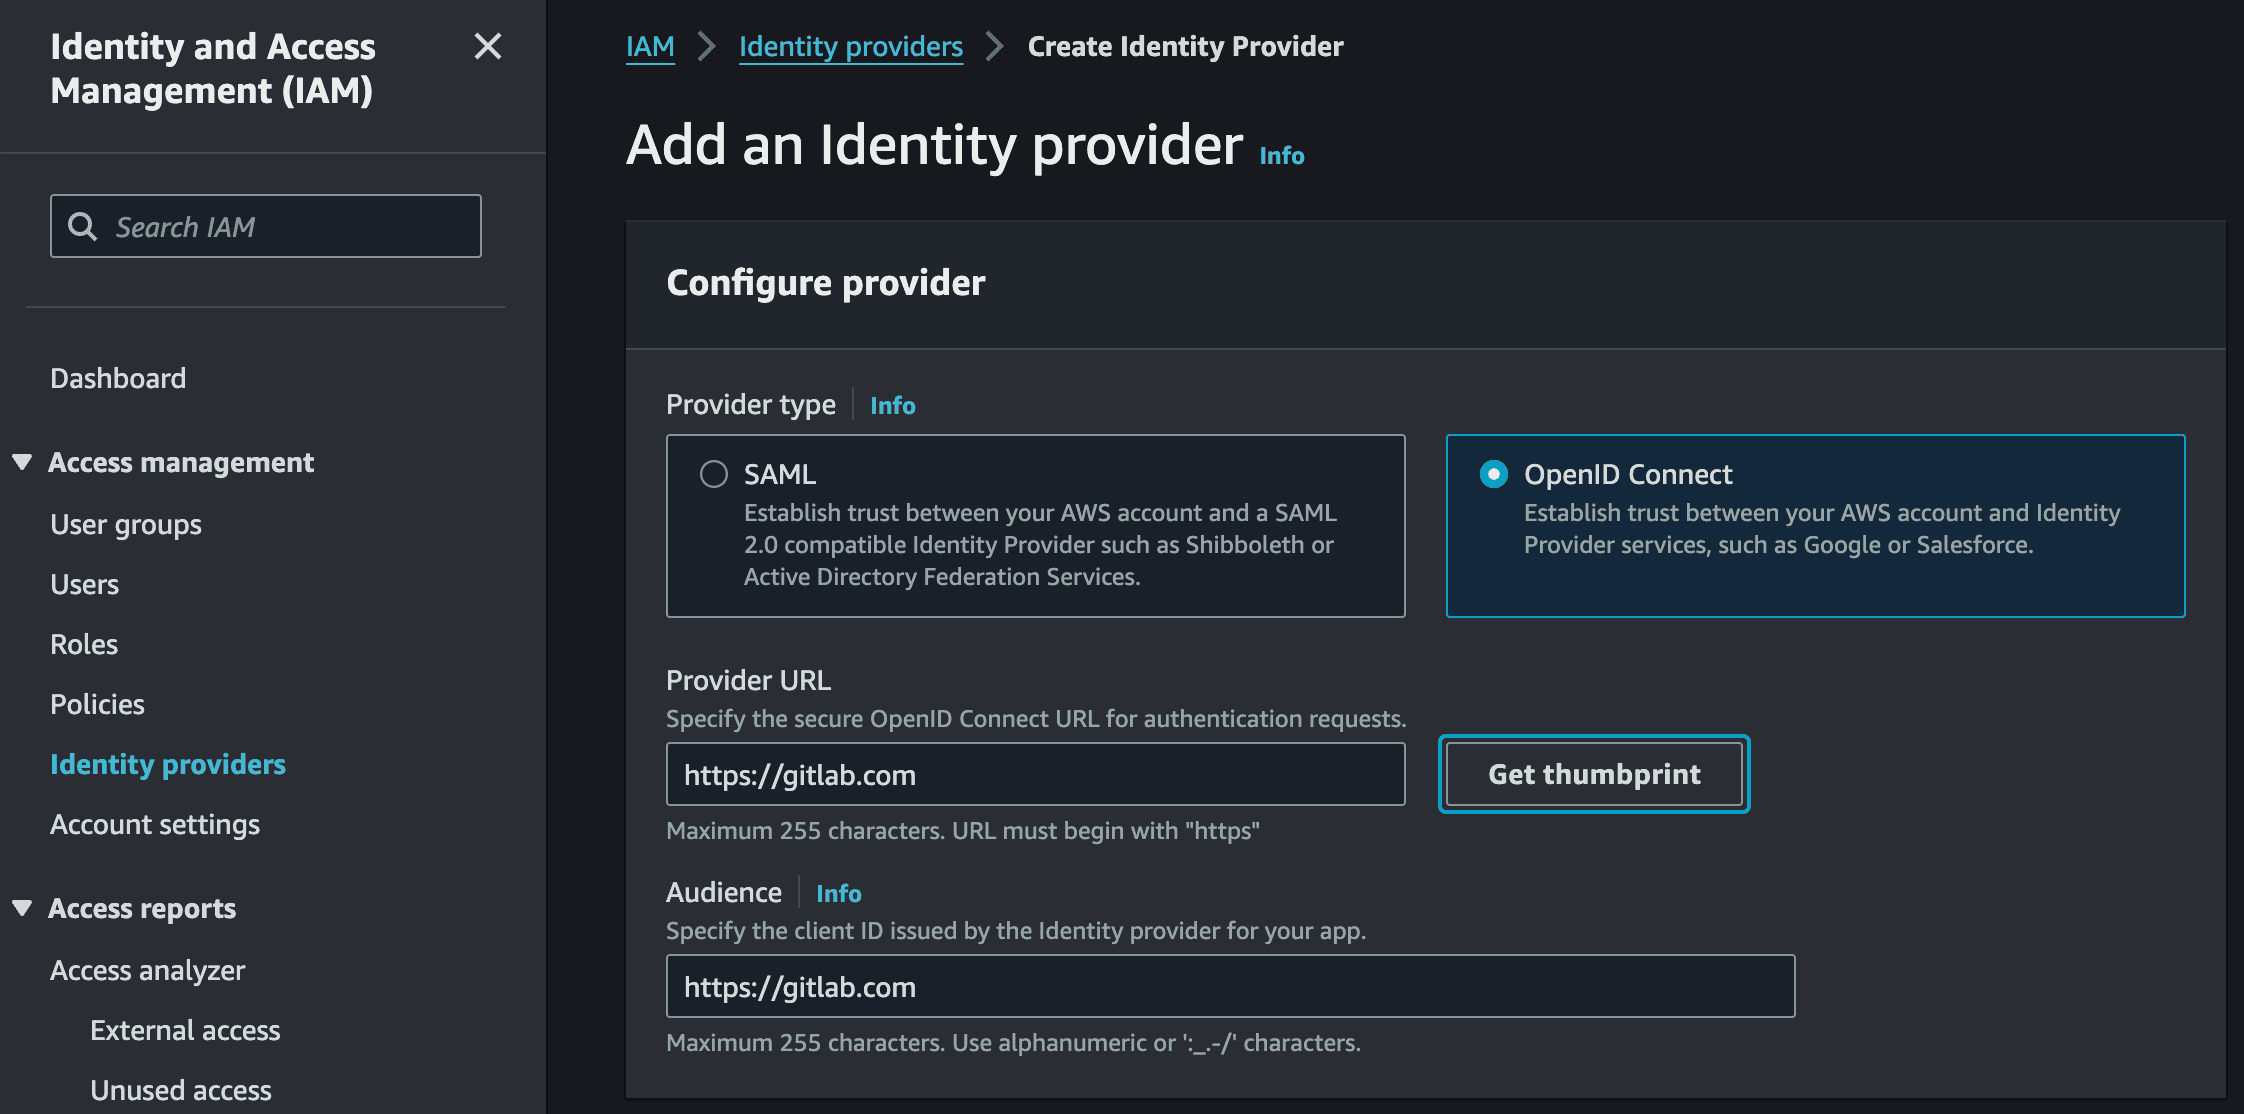
Rather than storing cloud credentials as pipeline secrets, we use OpenID Connect (OIDC) to let the pipeline authenticate directly with the cloud provider. This is the recommended approach for regulated environments: no long-lived credentials to rotate, no secrets to leak, and a full audit trail of which pipeline run assumed which role.
In the IAM console, navigate to Identity Providers and add a new provider. Select OpenID Connect and set the provider URL to https://gitlab.com and the audience to https://gitlab.com. Click Get thumbprint to retrieve the certificate fingerprint — the OIDC thumbprint page in the AWS documentation describes how this is obtained. Then save the provider.
Step 3: Create an IAM Role for the Pipeline
Create an IAM role that the pipeline will assume. Under trusted entity, select Web identity and choose the GitLab identity provider created in the previous step. Attach only the permissions the pipeline needs. For this example, that is access to S3, DynamoDB, and SQS.
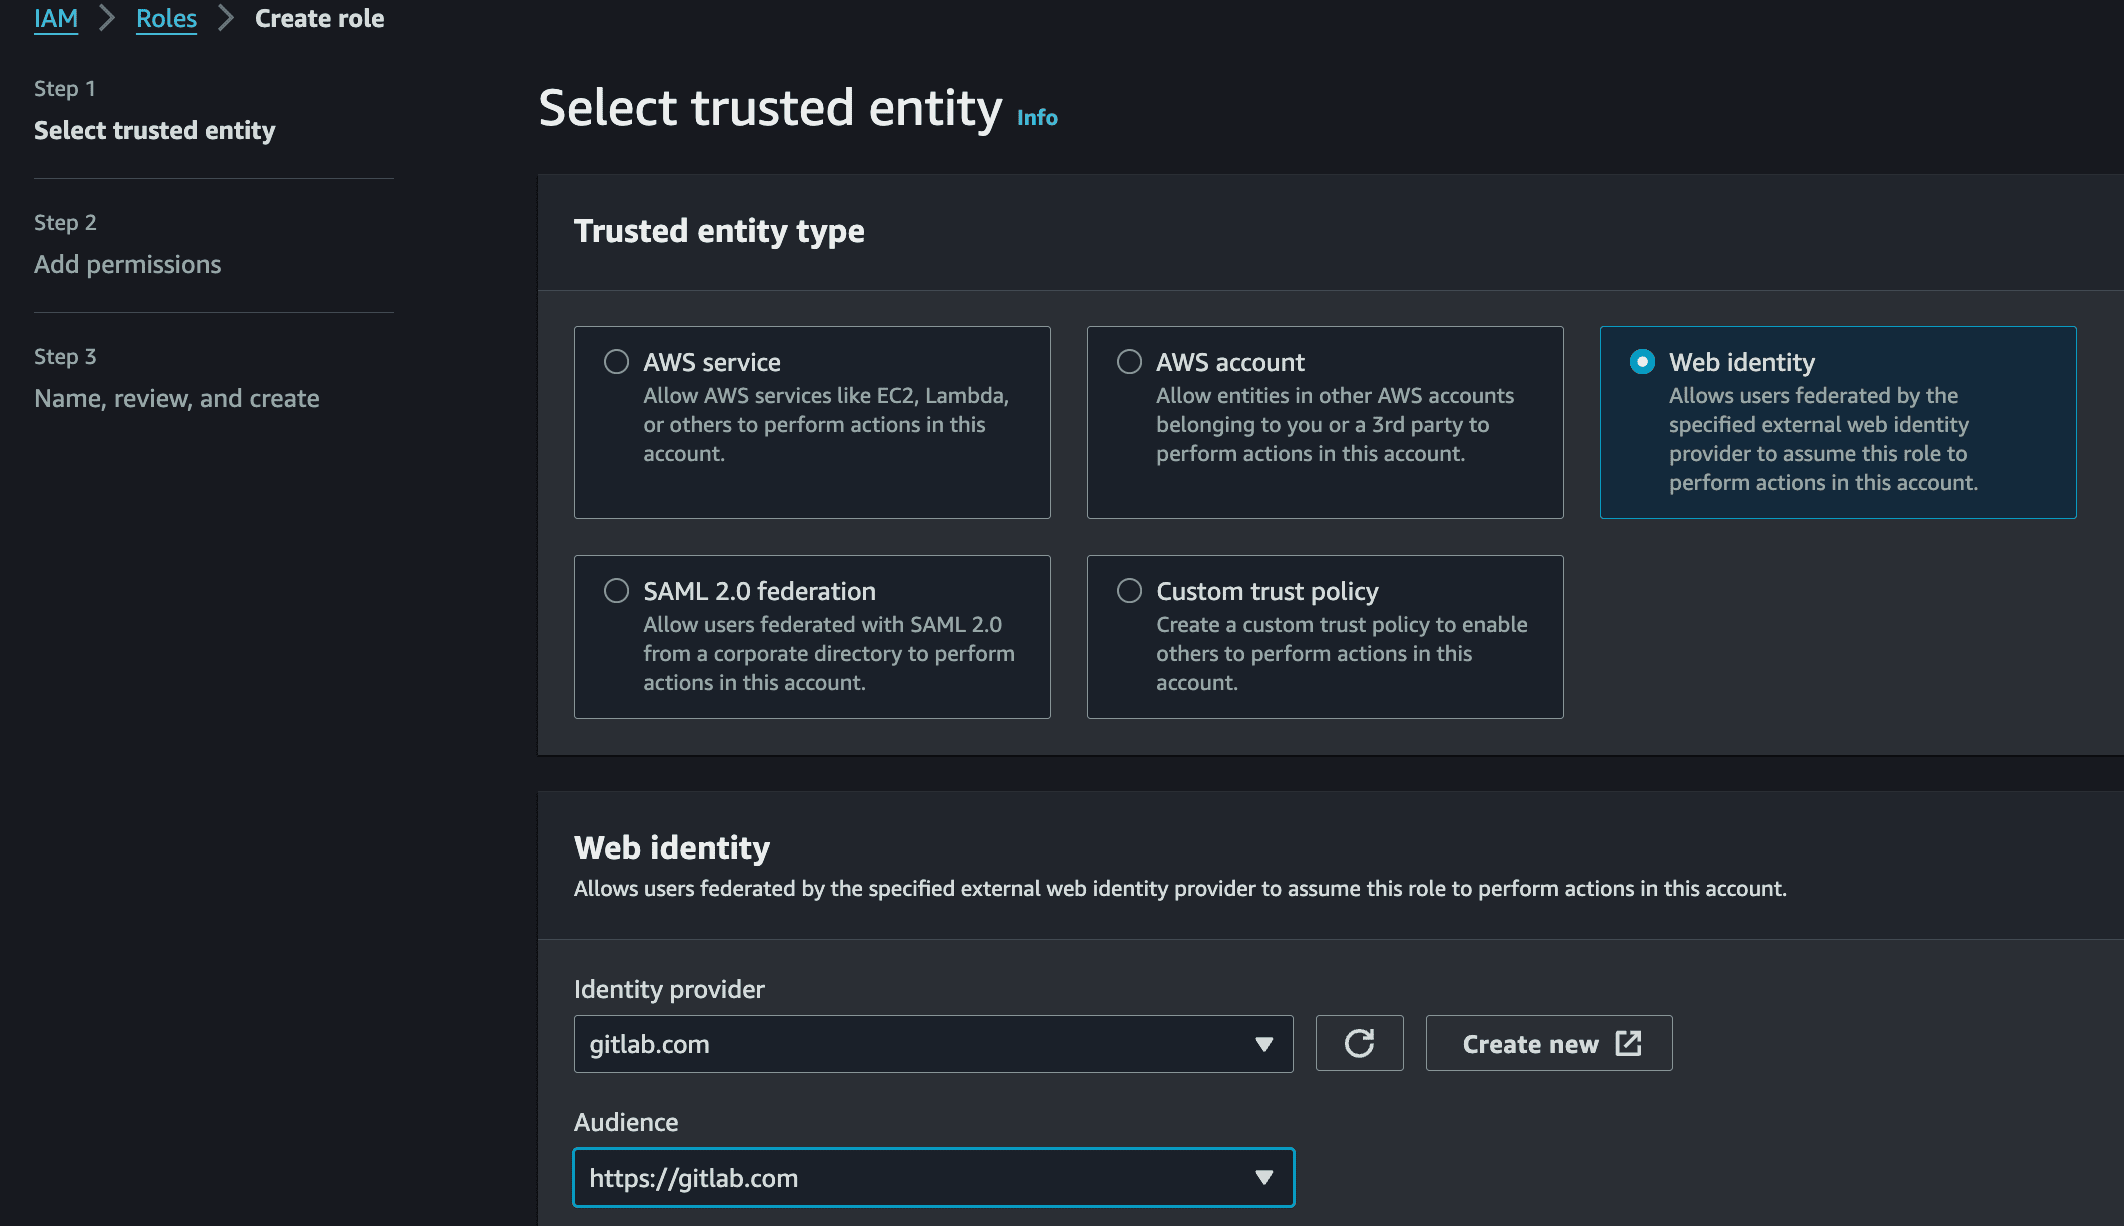
After creating the role, edit its trust policy to scope it to a specific repository and branch. This ensures only pipelines running on the main branch of your specific repository can assume the role. For more detail, see the GitLab documentation on CI/CD cloud services for AWS:
{
"Version": "2012-10-17",
"Statement": [
{
"Effect": "Allow",
"Principal": {
"Federated": "arn:aws:iam::{AWS_ACCOUNT_ID}:oidc-provider/gitlab.com"
},
"Action": "sts:AssumeRoleWithWebIdentity",
"Condition": {
"StringLike": {
"gitlab.com:sub": "project_path:{GITLAB_GROUP}/{GITLAB_PROJECT}:ref_type:branch:ref:main"
}
}
}
]
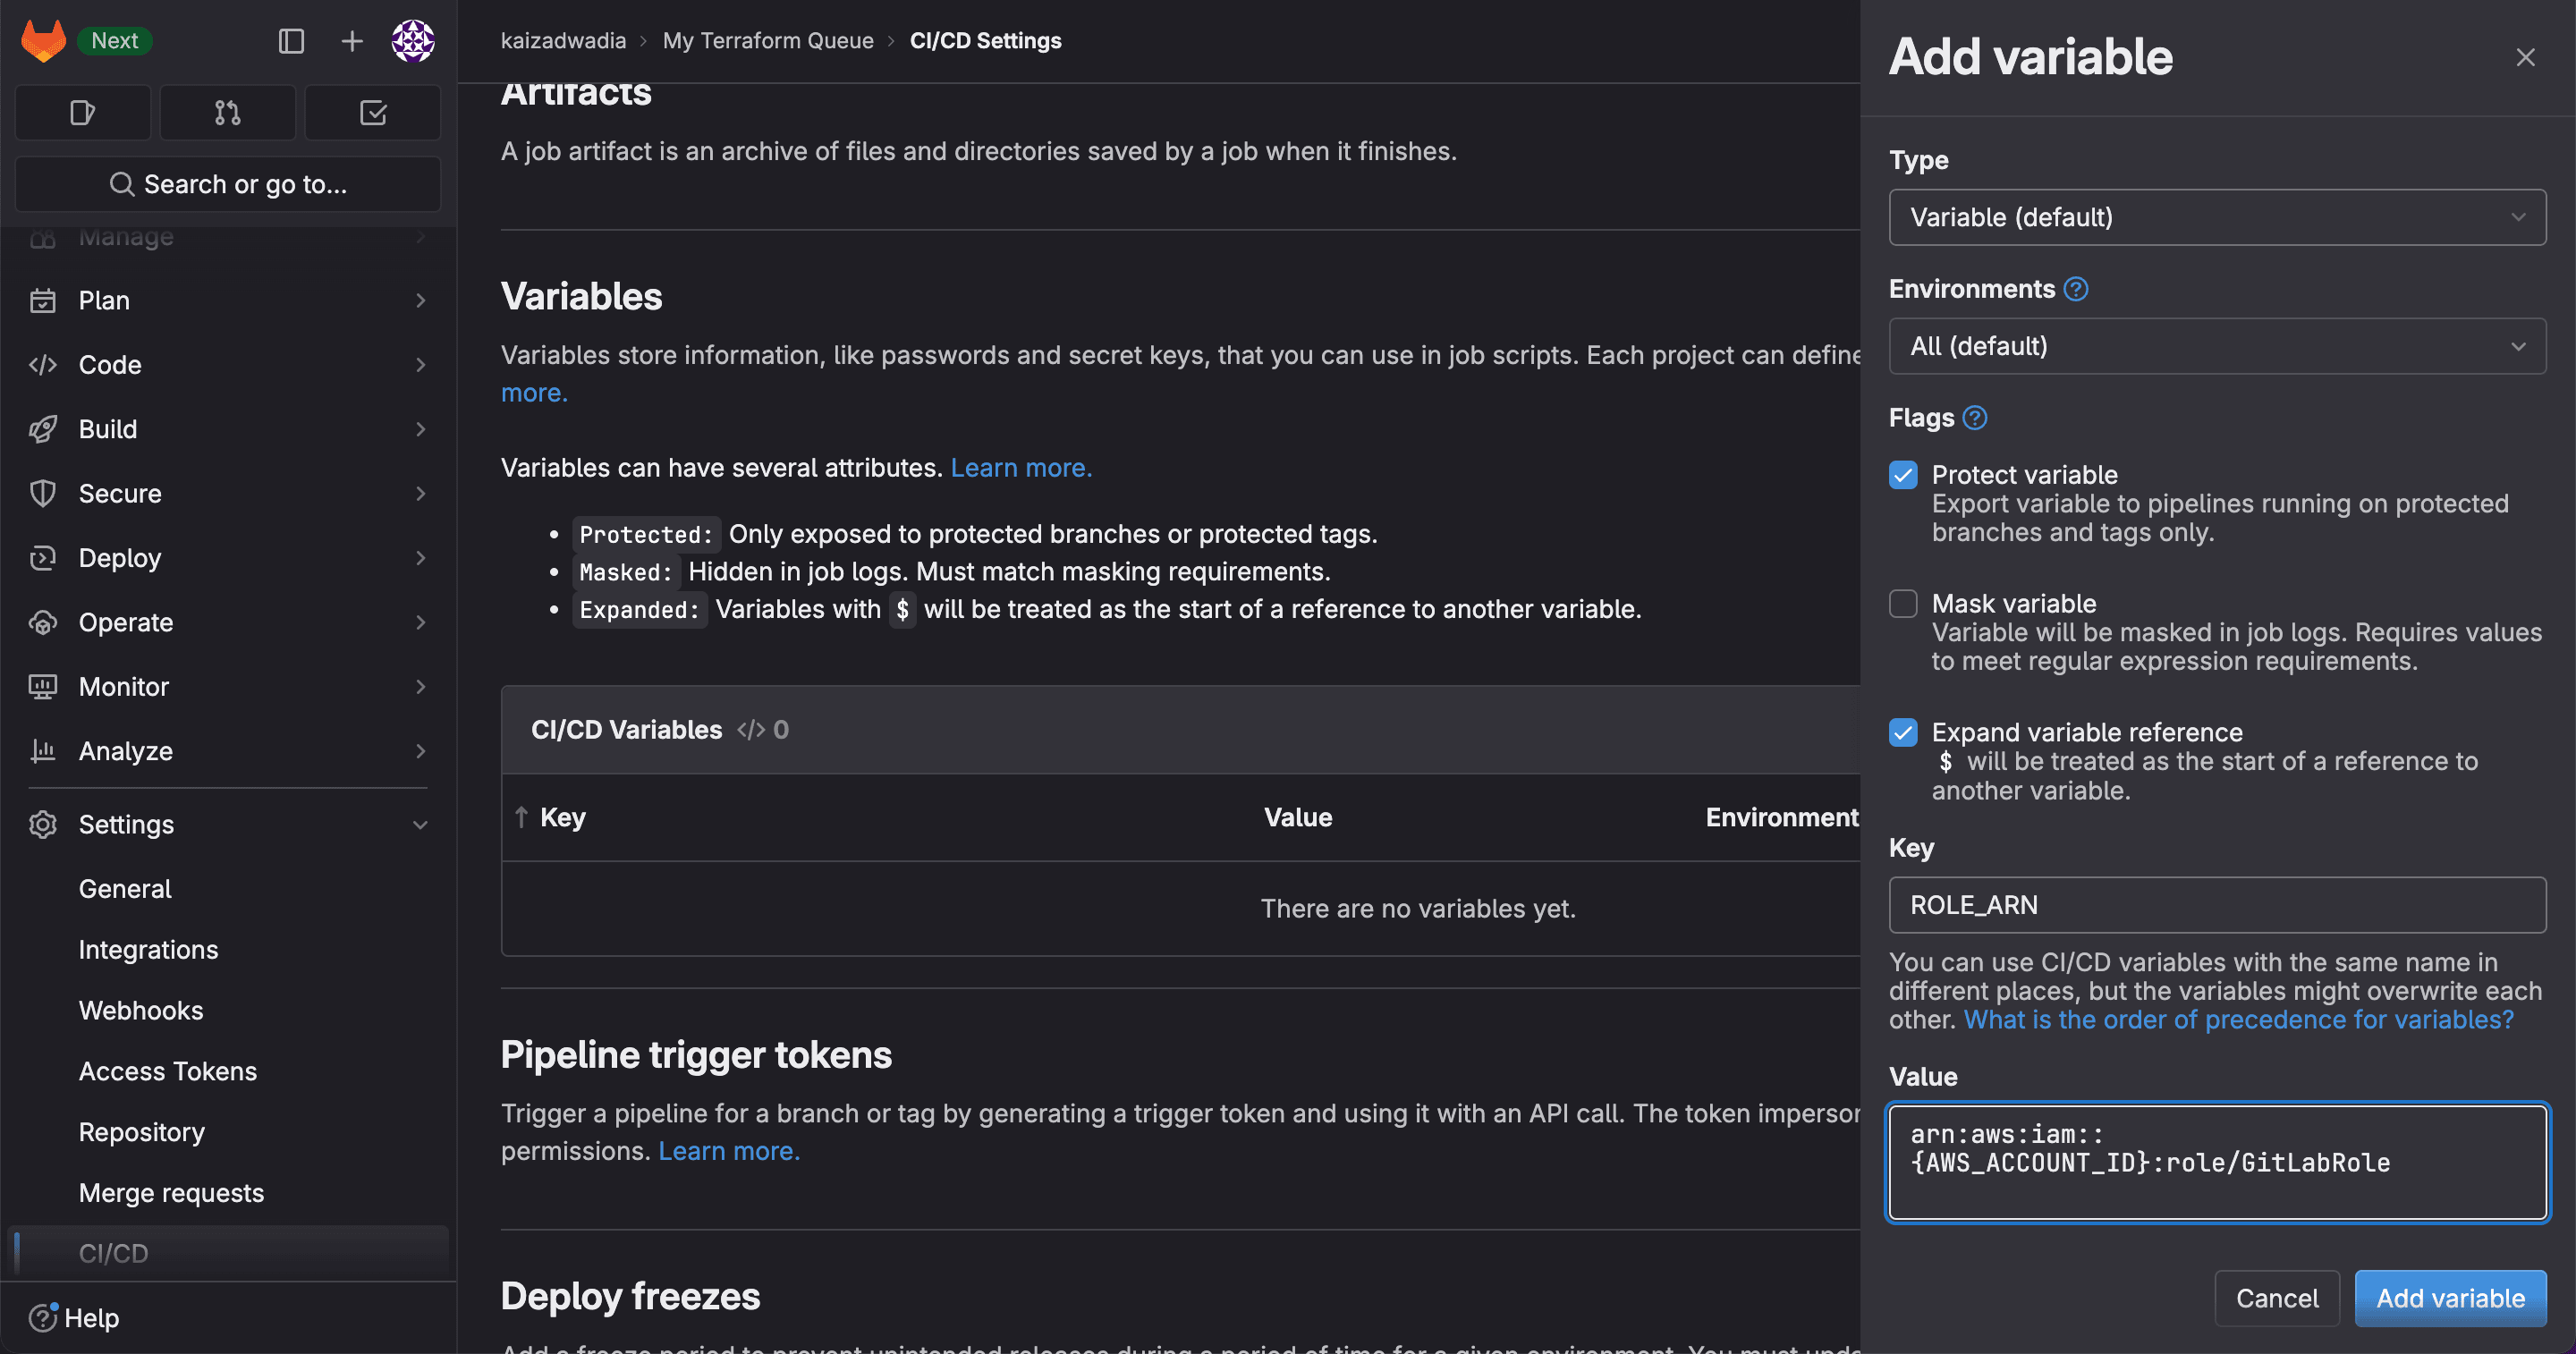
}Note the role ARN. It will be stored as a pipeline variable in the next step.
Step 4: Set Up Remote State Management
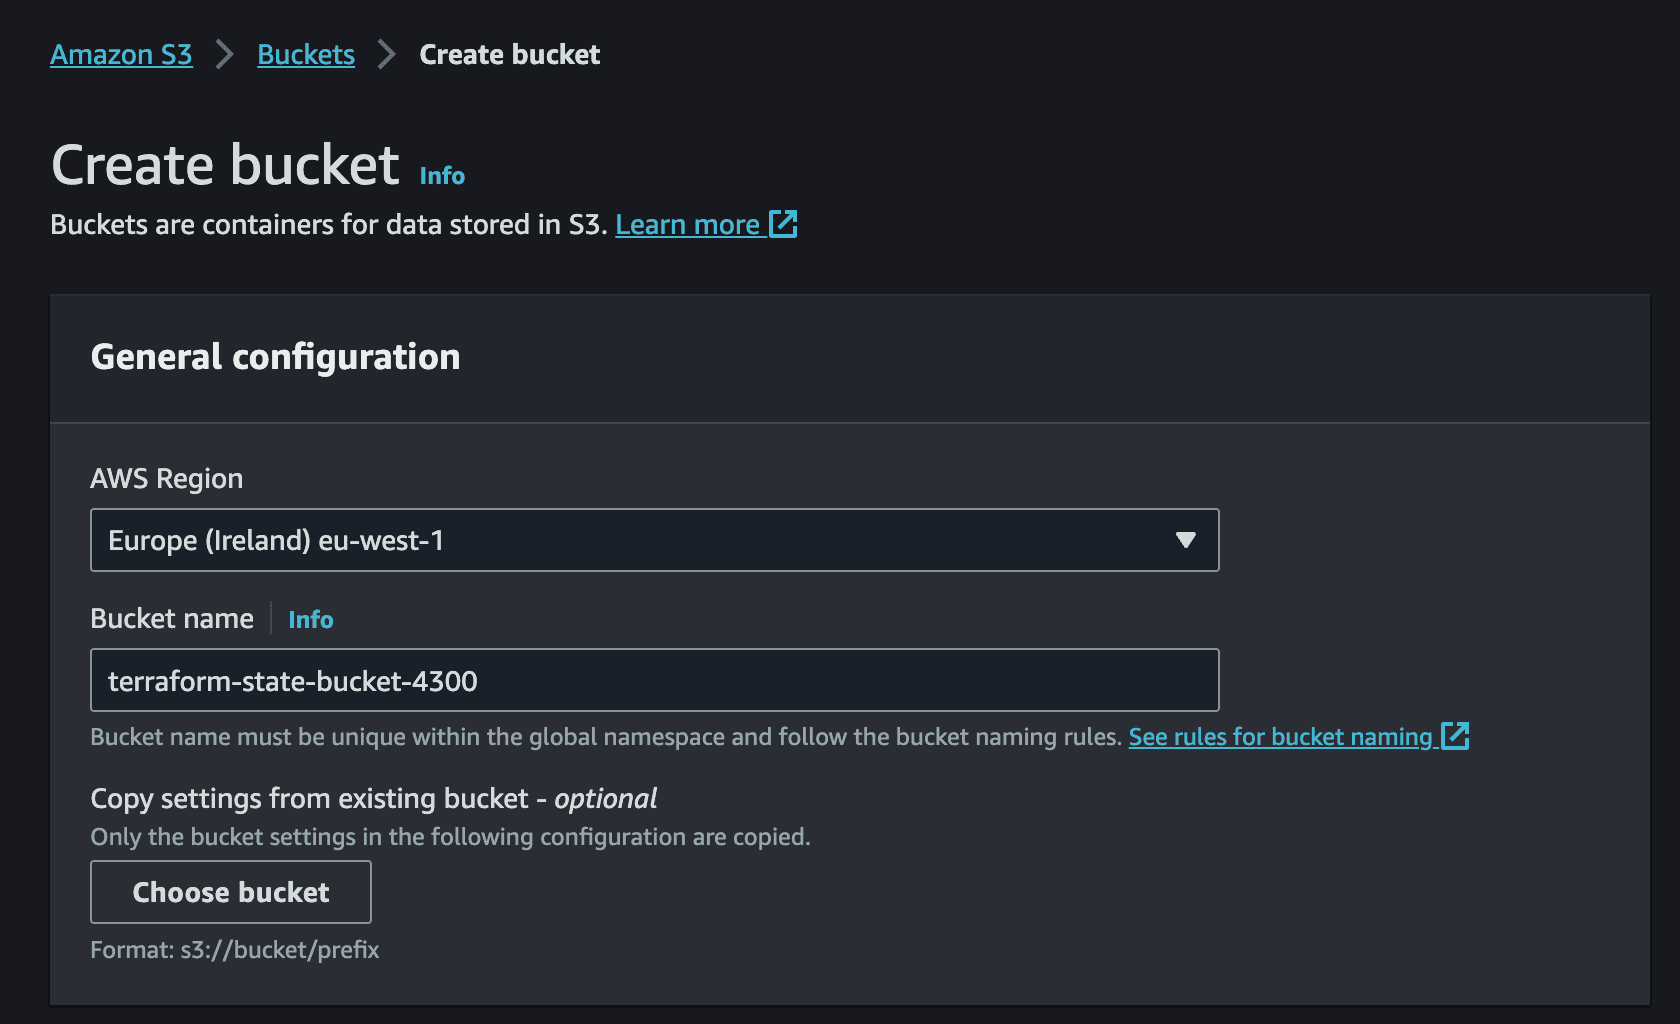
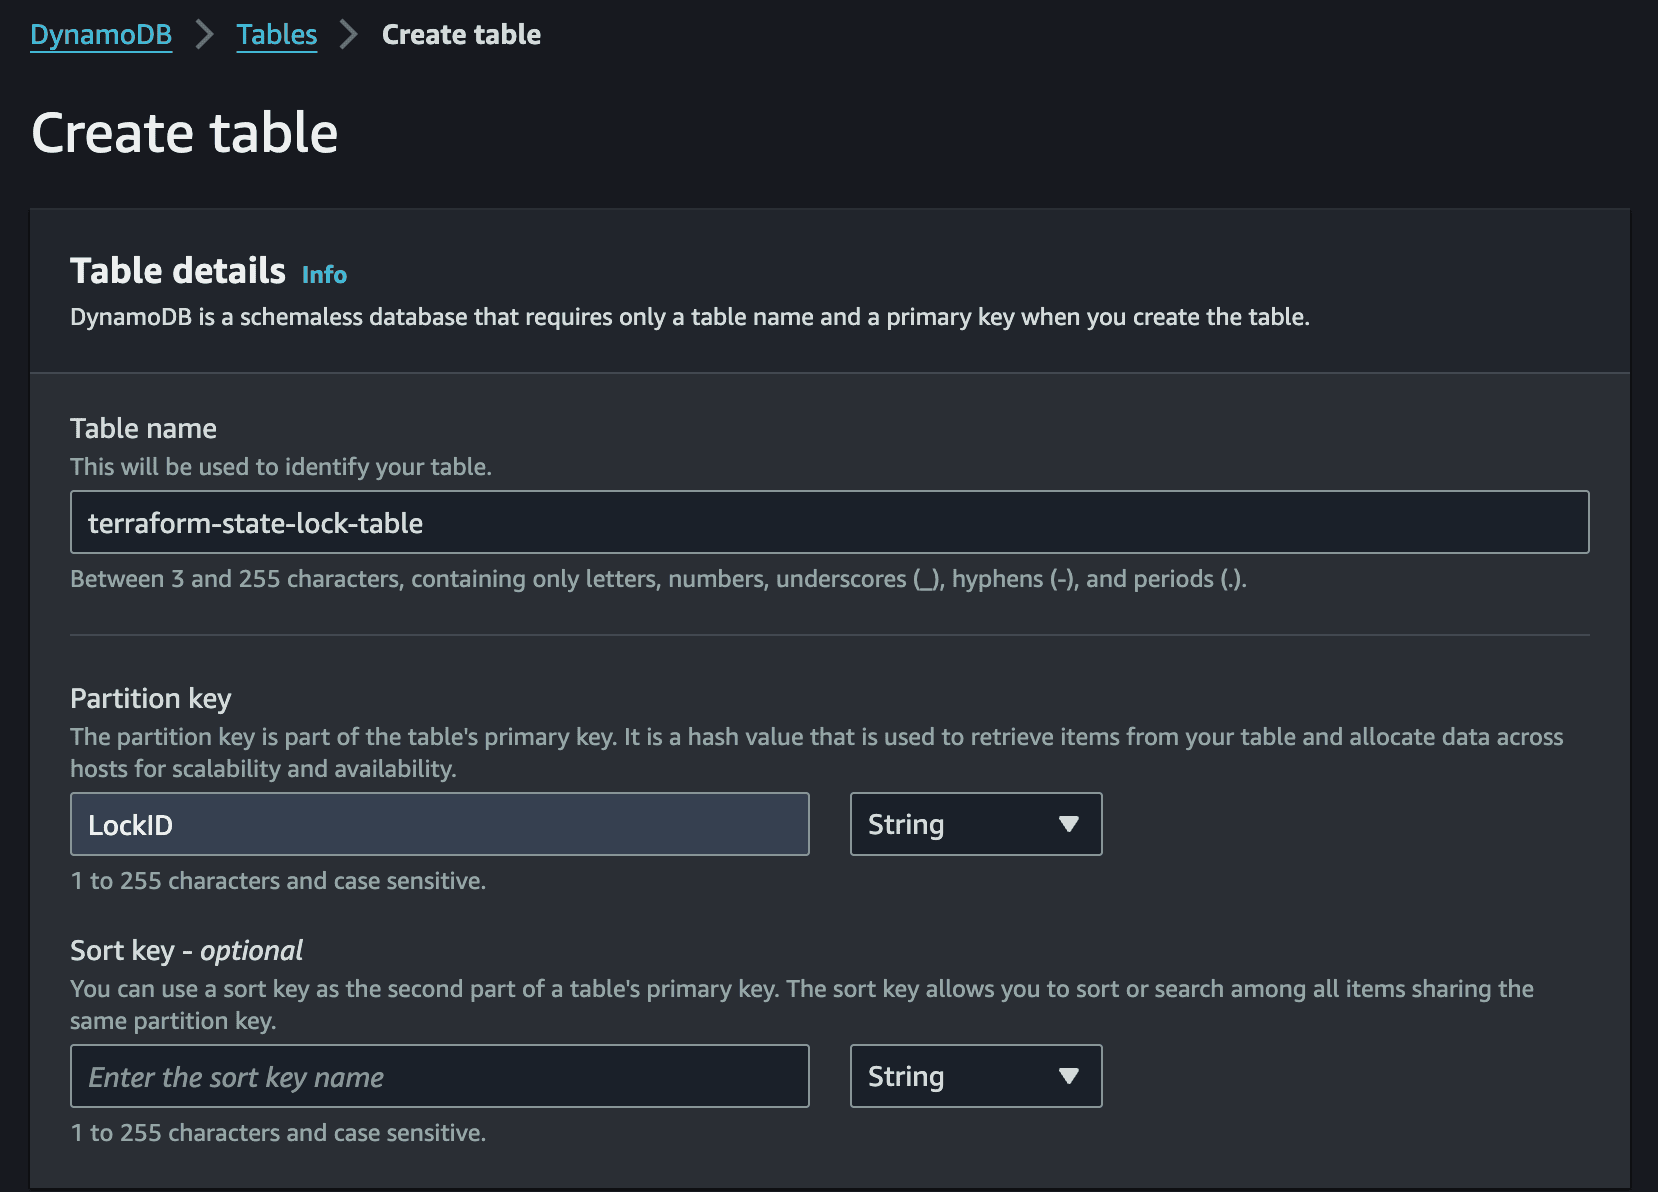
Terraform tracks deployed infrastructure in a state file. Storing this file locally is not viable for team environments or automated pipelines. Remote state in an object storage bucket solves this, and a database table provides state locking to prevent two pipeline runs from modifying infrastructure simultaneously.
Create an S3 bucket with a globally unique name such as terraform-state-bucket-XXXX and enable server-side encryption (SSE-S3). Then create a DynamoDB table named terraform-state-lock-table with a partition key of LockID (string type). Both resources should be in the same region.
Step 5: Write the Pipeline Configuration
In the GitLab repository settings, add two CI/CD variables: ROLE_ARN set to the role ARN from Step 3, and AWS_DEFAULT_REGION set to your target region.
Create a .gitlab-ci.yml file in the repository root. The pipeline uses AWS CLI profiles to keep credentials separate and switch between them easily:
stages:
  - deploy

deploy:
  stage: deploy
  only:
    - main
  image:
    name: hashicorp/terraform:light
    entrypoint: [""]
  id_tokens:
    GITLAB_OIDC_TOKEN:
      aud: https://gitlab.com
  before_script:
    - echo "${GITLAB_OIDC_TOKEN}" > /tmp/web_identity_token
    - mkdir ~/.aws
    - echo -e "[profile oidc]\nrole_arn=${ROLE_ARN}\nweb_identity_token_file=/tmp/web_identity_token" >> ~/.aws/config
  script:
    - terraform init
    - terraform apply -auto-approve
The pipeline runs only on commits to main, uses the Terraform Docker image, and authenticates via the OIDC token. The before_script writes the token to a file and configures an AWS CLI profile called oidc that Terraform will use to assume the role.
Step 6: Deploy the Infrastructure
Update main.tf to add the remote backend configuration above the resource definition:
terraform {
backend "s3" {
bucket = "terraform-state-bucket-XXXX"
key = "statefile.tfstate"
dynamodb_table = "terraform-state-lock-table"
encrypt = true
profile = "oidc"
}
}
provider "aws" {
profile = "oidc"
}
resource "aws_sqs_queue" "queue" {
name = "sample-queue"
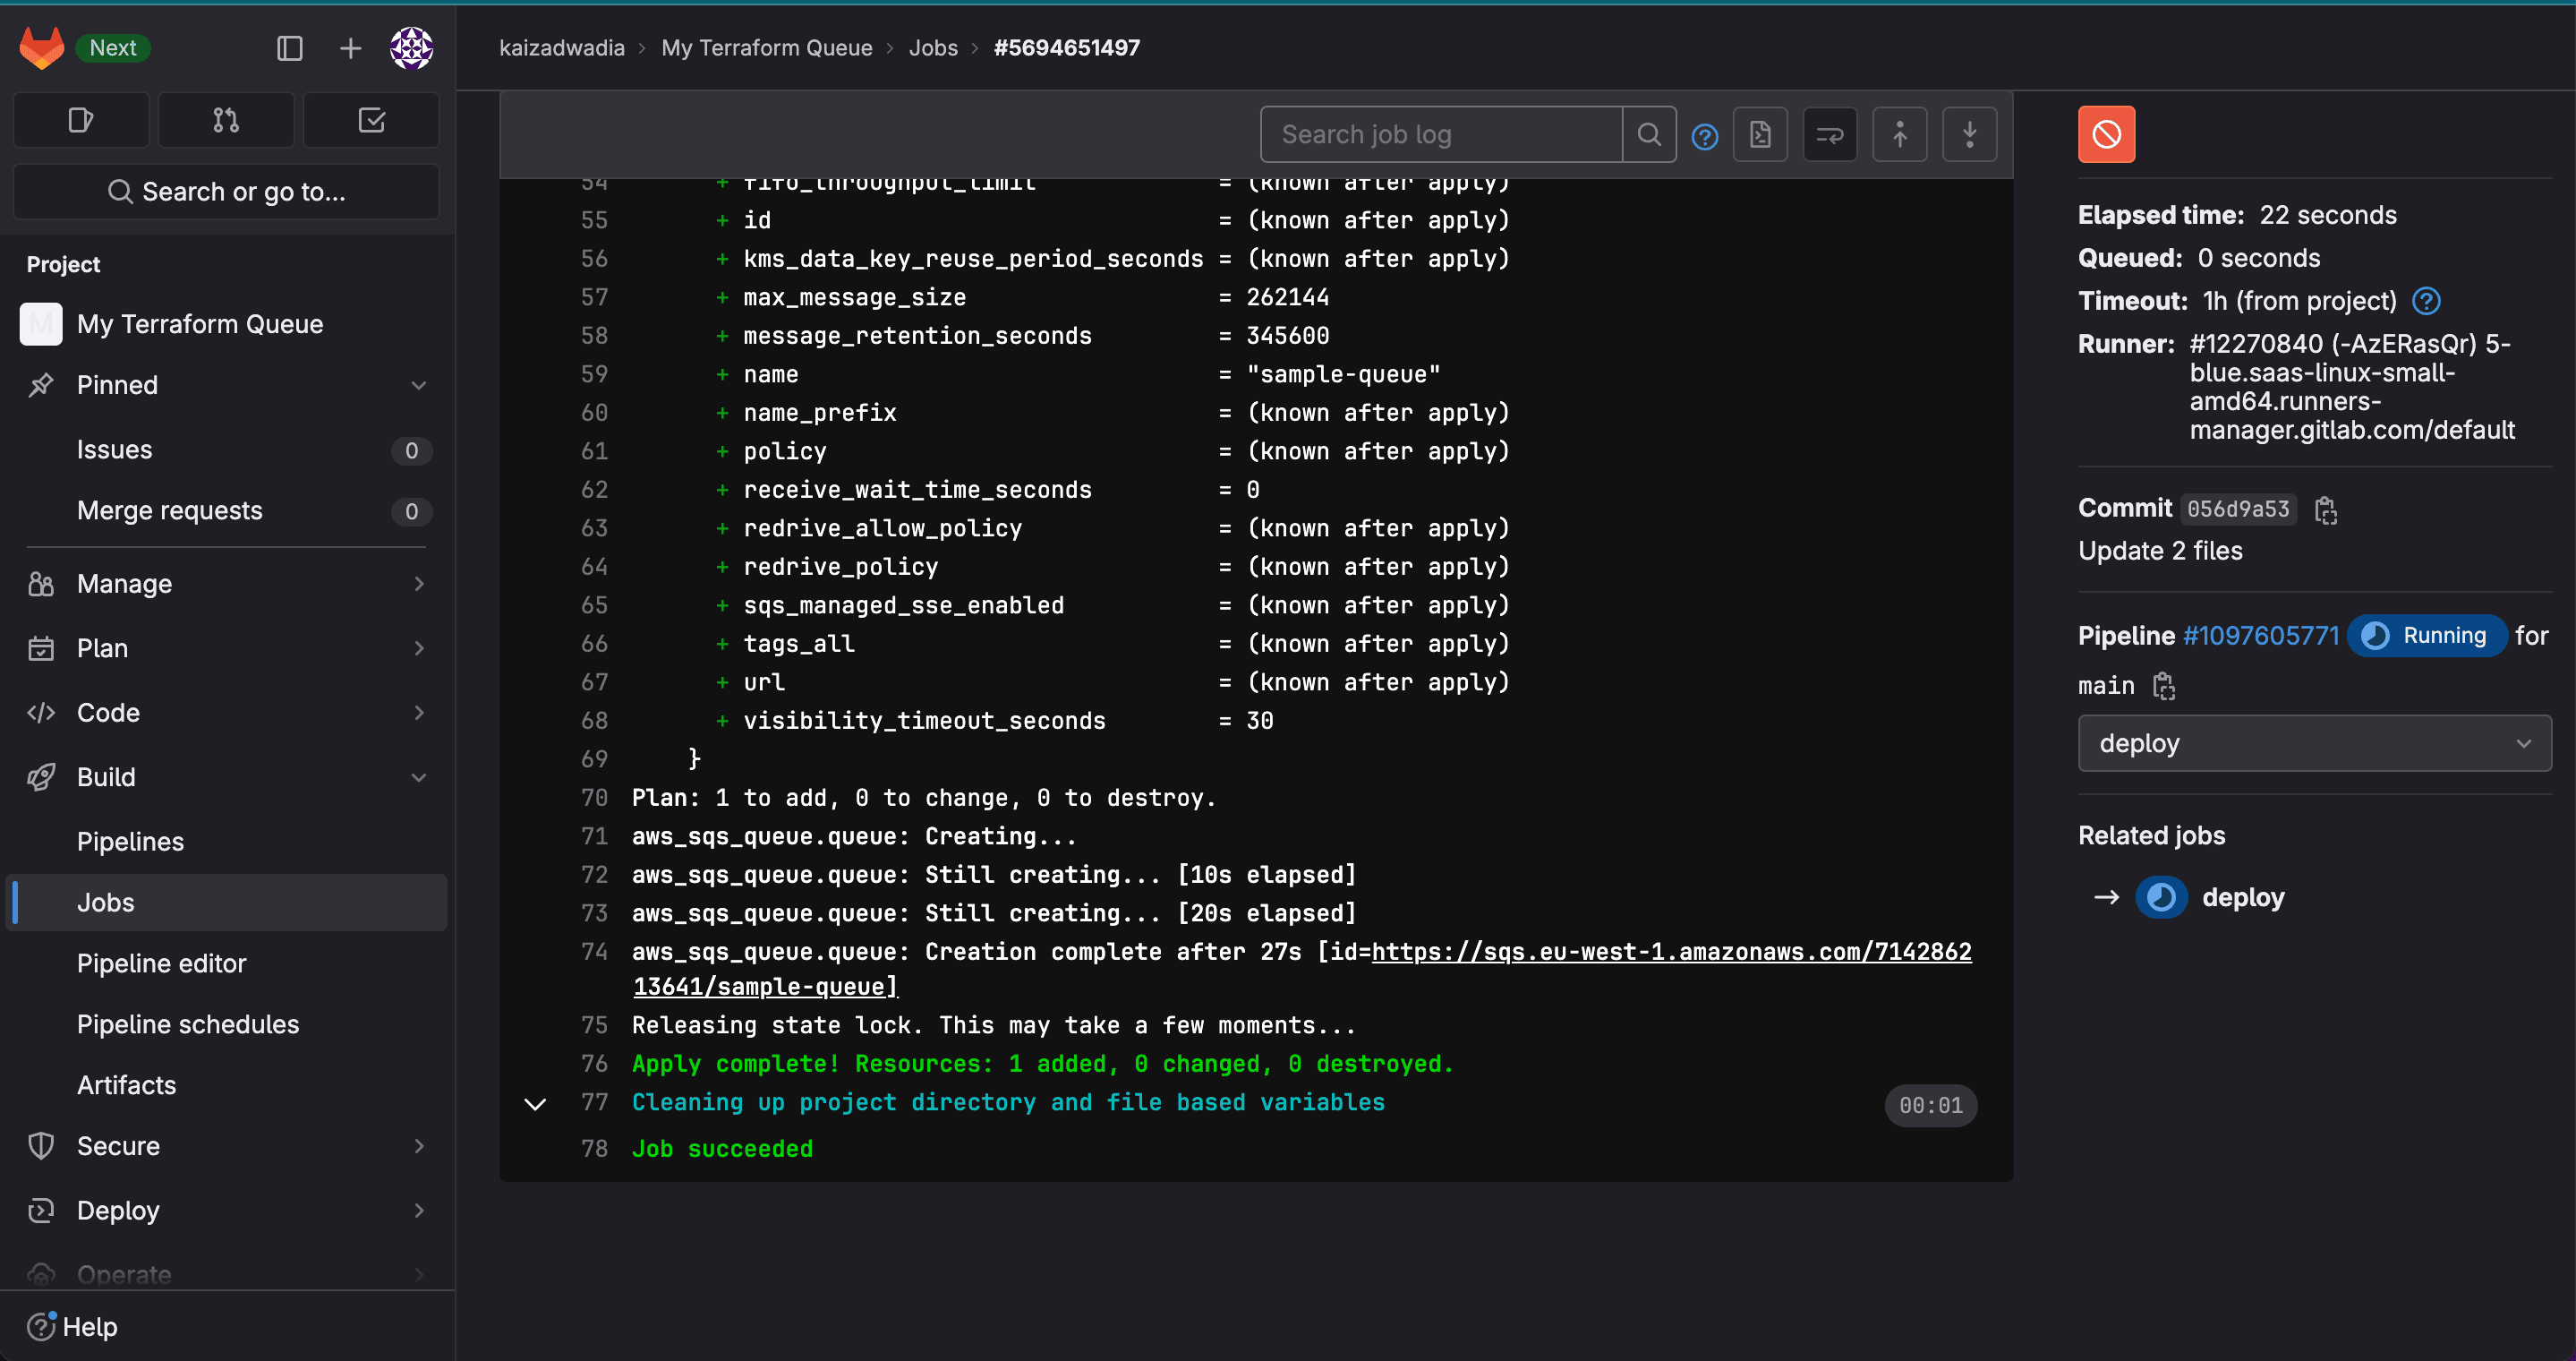
}Replace XXXX with the actual bucket name. Commit this to main. The pipeline will trigger automatically. You can monitor the run under Build > Jobs in the GitLab sidebar. If successful, the queue will appear in the cloud console and the state file will be stored in the S3 bucket.
Applying This Pattern to Healthcare Infrastructure
The same pipeline structure applies directly to healthcare AI infrastructure. A few additional considerations for regulated environments:
- Approval gates: Add a manual approval step before the apply stage for production deployments. Most CI/CD platforms support environment-level protection rules that require a named reviewer to approve before the pipeline proceeds.
- Policy as code: Integrate a tool like Checkov or tfsec into the pipeline to scan Terraform plans for security misconfigurations before apply. This catches issues like unencrypted storage, overly permissive IAM policies, or missing audit logging before they reach production.
- Immutable infrastructure: Prefer replacing resources over modifying them in place. This makes rollbacks straightforward and ensures the deployed state always matches the version-controlled definition.
- Audit trail: Pipeline logs, combined with version control history and remote state, give you a complete record of who triggered each deployment, what changed, and when. This is the foundation of a defensible change management process under HIPAA and GxP frameworks.
Further Reading
- Setting Up OpenID Connect with GitLab CI/CD to Provide Secure Access to Environments in AWS Accounts
- Continuous Integration with GitLab at 10,000 Feet
- Bootstrapping your Terraform automation with Amazon CodeCatalyst
Conclusion
Automated infrastructure deployment with CI/CD and infrastructure as code removes the manual steps that introduce risk in regulated environments. Every change is version-controlled, every deployment is logged, and no human needs direct console access to production. The pattern described here, OIDC-based authentication, remote state with locking, and pipeline-driven apply, is a reusable foundation for any healthcare AI infrastructure team looking to build repeatable, auditable deployment workflows.